


The Ultimate Guide to Sample Rate, Bit Depth & Buffer Size
The Ultimate Step-by-Step Audio Science Guide for DJs, Music Producers & Recording Artists. Unserstanding properly - Sample Rate, Bit Depth & Buffer Size
If you have ever opened a DAW like Ableton Live, FL Studio or Logic Pro, connected an audio interface, launched rekordbox or Serato DJ Pro, and suddenly saw terms like 44.1kHz, 48kHz, 24-bit or 256 buffer size, then you are not alone. Almost every beginner DJ, producer, podcaster or recording artist uses these settings daily without actually understanding what they truly mean. Most people simply copy settings from YouTube videos or tutorials without understanding the science behind them. The problem is that once your projects become bigger, your plugins become heavier, or your recordings become more professional, these settings suddenly start affecting your sound quality, CPU performance, recording latency, crackling noises and overall workflow.
This is where understanding digital audio becomes extremely important. In reality, sample rate, bit depth and buffer size are not just technical numbers hidden inside software menus. They are the foundation of modern digital sound. Every song on Spotify, every DJ set in clubs, every Netflix film soundtrack, every podcast, every YouTube video and every professional recording studio in the world depends on these concepts. If you truly understand them, you instantly gain a much deeper understanding of how audio actually works inside computers, DJ systems and recording equipment.
In this complete guide by DJ Training Academy, you are going to learn not only what sample rate, bit depth and buffer size mean, but also why they exist, how sound is converted into digital information, what DAC and ADC actually do, why 44.1kHz became the global standard, why 48kHz dominates the video industry, what aliasing truly is, how latency works, and what settings professionals actually use in real-world studios and live performances.
This is not going to be another short surface-level article. By the end of this blog, you will understand digital audio in a way most creators never do.
Hey!! If you are a lazy reader then we got you a full YouTube video on this same topic.
Understanding Sound Before, Understanding Digital Audio
Before we even talk about sample rates and bit depths, we first need to understand what sound actually is. In the real world, sound exists as analog energy. When you speak into a microphone, clap your hands, play a piano or hear music from a club speaker, what you are actually experiencing is air pressure moving in waveforms. These sound waves continuously travel through the air in smooth motion. They do not move in steps or blocks. Analog sound is fluid and continuous.

Computers, however, do not understand continuous analog signals. Computers only understand numbers and binary information. This creates a huge problem because music in the real world is analog, while computers operate digitally. So how does a computer record a singer’s voice? How does your DJ controller play music from your laptop? How does an audio interface convert your microphone signal into something your DAW can process?
This is where digital audio conversion begins.
How Audio Interfaces Actually Work
Whenever you connect a microphone into an audio interface, something incredibly fascinating happens internally. Your microphone captures analog sound waves and sends electrical signals into the interface. The audio interface then uses a component called an ADC, which stands for Analog to Digital Converter. This converter’s job is to translate analog electrical signals into digital numerical information that your computer can understand.
Think of the ADC like an ultra-fast photographer taking thousands of snapshots every second of the incoming audio waveform. Each tiny snapshot captures the shape and intensity of the sound at that exact moment. These snapshots are then reconstructed by the computer to recreate the original sound as accurately as possible.

This is exactly where the term “sample rate” comes from. The system is literally taking samples of the audio waveform thousands of times every second.
When audio comes back out from your speakers or headphones, another process happens in reverse. Your audio interface uses a DAC, which stands for Digital to Analog Converter. The DAC converts the digital numerical data back into analog electrical signals so that your speakers can physically reproduce sound waves in the air again.
Most beginners underestimate how important DAC and ADC quality actually is. A high-quality DAC can dramatically improve stereo imaging, clarity, depth, punch and detail. This is one of the biggest reasons why professional studio interfaces sound far superior compared to cheap laptop sound cards or low-end DJ controllers.
What Is Sample Rate? Understanding the Core of Digital Audio
Sample rate simply refers to how many times per second the audio system measures or “samples” the analog sound wave.
When you see a sample rate of 44,100 Hz, it means the system is taking 44,100 tiny measurements of the waveform every single second.

To understand this more clearly, imagine a video camera. A video is actually made up of many still images shown quickly one after another. If the frame rate is too low, motion starts looking choppy and unnatural. Audio sampling works in a somewhat similar way. The more samples you take, the more accurately the digital system can represent the original analog waveform.
However, here comes the fascinating part. Scientists discovered that we do not actually need infinite samples to reproduce sound accurately. There is a very important scientific theory behind this called the Nyquist-Shannon Sampling Theorem.
The Nyquist Theory Explained in the Simplest Way Possible
The Nyquist theorem is one of the most important principles in digital audio engineering. It states that to accurately reproduce a frequency, you must sample at least twice the highest frequency present in the signal.
Human hearing generally ranges between: 20Hz to 20,000Hz. This means that if humans can hear up to approximately 20kHz, then according to Nyquist theory, we need at least: 20,000 X 2 = 40,000Hz samples per second to reproduce the entire audible range correctly. This is exactly why 44.1kHz became the global audio standard. Engineers needed slightly more headroom above 40kHz to allow anti-aliasing filters to function properly, so they selected 44,100Hz.

This number was not random at all. It was carefully chosen based on human hearing science and digital reconstruction mathematics.
Why Not 40000Hz? Understanding the Logic
Many beginners ask a very smart question: if computers are just taking snapshots, then why not use a lower sample rate like 40000Hz?
The answer becomes obvious once we apply Nyquist theory again.
If the sample rate is 40000Hz, then the maximum reproducible frequency becomes:
40000 \div 2 = 20000 Hz
This would cut off almost all high frequencies in music. Vocals would sound dull and telephone-like. Cymbals, air frequencies, brightness and clarity would disappear. This is why old telephones sound narrow and compressed. Their systems intentionally use very limited frequency ranges to reduce bandwidth.
Professional music requires much wider frequency reproduction, which is why higher sample rates are necessary.
What Is Aliasing and Why Does It Sound Horrible?
Aliasing is one of the most misunderstood concepts in audio production, yet it is extremely important. When the sample rate is too low to accurately capture high frequencies, those frequencies start folding back into the audible range incorrectly. Instead of reproducing the sound naturally, the system creates artificial frequencies and distortions that were never present in the original sound.
This creates harsh digital artifacts, metallic textures and unpleasant high-frequency distortion.

Modern plugins and synthesizers spend massive amounts of processing power trying to reduce aliasing. Many professional plugins use oversampling technology, where the plugin temporarily processes audio internally at much higher sample rates before converting back down again. This helps maintain smoother sound quality, especially during saturation, distortion and aggressive processing.
Interestingly, one major reason analog gear still sounds pleasing is because analog systems do not suffer from digital aliasing in the same way digital systems do.
Understanding the Difference Between 44.1kHz and 48kHz
One of the biggest debates in the music production world is whether producers should use 44.1kHz or 48kHz.
Technically speaking, 48kHz captures slightly more high-frequency information than 44.1kHz. However, the audible difference for most listeners is extremely small. In blind listening tests, many people cannot reliably distinguish between them.
The reason 48kHz became the standard for film, broadcasting and video production is largely historical and technical. Video systems synchronized more efficiently with 48kHz clocking standards, so the film and television industries adopted it as their default format.
Today, if you are primarily creating songs for streaming platforms like Spotify or Apple Music, 44.1kHz remains perfectly professional. If you are working with YouTube videos, podcasts, filmmaking or cinematic content, 48kHz is generally preferred because it integrates more smoothly with video workflows.
Neither setting is “wrong.” The correct choice depends on your workflow.
Should You Record at 96kHz or 192kHz?
This is where marketing often confuses people.
Many companies advertise ultra-high sample rates like 96kHz and 192kHz as if they automatically produce magical sound quality improvements. In reality, the situation is much more complicated.
Higher sample rates do provide some technical advantages. Certain plugins behave slightly more accurately, time stretching algorithms can improve, and aliasing may reduce during aggressive processing. However, these benefits come at a cost. CPU usage increases dramatically, projects become much heavier, storage requirements multiply, and plugin counts decrease.
Most importantly, the audible improvement is often extremely subtle for normal listeners.
This is why many professional producers still comfortably work at 44.1kHz or 48kHz every day, even on world-class records.
What Is Bit Depth?
If sample rate determines how often the audio is measured, then bit depth determines how much detail each measurement contains.
Bit depth directly affects dynamic range, noise floor and recording headroom. In simple terms, it controls how accurately the system can represent differences between quiet and loud sounds.
A 16-bit recording has less dynamic resolution than a 24-bit recording. This means quieter details become less precise and the noise floor becomes more noticeable.

CD audio traditionally uses 16-bit audio, which provides approximately: 96dB dynamic range
However, professional studios today almost universally use 24-bit recording because it offers approximately: 144dB dynamic range
This massive increase gives producers much more recording headroom and cleaner signal capture.
One of the biggest advantages of 24-bit recording is that engineers no longer need to record extremely hot levels near clipping. Since 24-bit provides such large dynamic range, you can leave comfortable headroom while still maintaining crystal-clear recordings.
This has fundamentally changed modern recording workflows.
What Is Buffer Size and Why Does Latency Happen?
Buffer size is one of the most practical settings you will deal with daily as a producer or DJ.
When your computer processes audio, it cannot calculate everything instantly in real time. Instead, it processes chunks of audio data in small groups called buffers.
A smaller buffer means the computer processes smaller chunks more frequently. This reduces latency, which is the delay between input and output. Low latency is extremely important while recording vocals, playing MIDI keyboards or scratching on DJ software because you need immediate response.
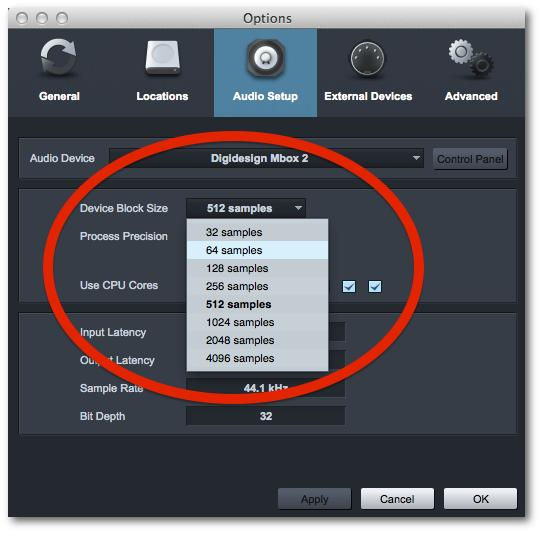
However, smaller buffers also place much heavier stress on the CPU. If the CPU cannot keep up, you start hearing clicks, pops and crackling noises.
Larger buffers give the CPU more time to process audio, making the system more stable during large mixing sessions with many plugins. The downside is increased latency.
This is why producers often switch buffer sizes depending on what they are doing.
During recording:
low buffer size
During mixing and mastering:
higher buffer size
This workflow is used in professional studios worldwide.
Best Professional Audio Settings for Most Users
For most DJs and producers, the best balance between quality, stability and CPU performance is surprisingly simple.
If you are recording vocals, instruments or MIDI, using 48kHz at 24-bit with a 64 or 128 sample buffer provides excellent professional performance.
If you are mixing large projects with many plugins, increasing the buffer size to 512 or even 1024 helps stabilize the session and reduces CPU strain.
For DJs using software like Traktor Pro or rekordbox, 44.1kHz with 24-bit audio and moderate buffer settings usually provides the best combination of low latency and reliability during live performance.
The important thing to understand is that higher numbers do not automatically mean better sound. Professional audio engineering is always about balance, efficiency and workflow.
The Biggest Truth Most Tutorials Never Tell You
Many beginners become obsessed with technical settings, believing that ultra-high sample rates or expensive interfaces alone will magically transform their music. In reality, the biggest improvements in sound quality usually come from completely different areas.
Room acoustics, speaker placement, arrangement, mixing decisions, sound selection and musical creativity affect the final result far more than whether you recorded at 44.1kHz or 96kHz.
A poorly mixed song recorded at 192kHz will still sound weak.
A beautifully produced song at 44.1kHz can sound world-class.
Technology matters, but knowledge matters more.
Final Thoughts
Understanding sample rate, bit depth and buffer size is one of the biggest turning points in becoming a professional DJ, producer or audio engineer. Once you truly understand how digital audio works, your workflow becomes smarter, your troubleshooting becomes faster, your recordings become cleaner and your confidence inside professional software increases massively.
These are not just random technical settings hidden inside menus. They are the mathematical foundation of modern music production itself.
The next time you open your DAW or DJ software and see terms like 44.1kHz, 24-bit or 256 buffer size, you will finally understand exactly what those numbers are doing behind the scenes.
#MusicProduction #AudioEngineering #DJLife #AbletonLive #FLStudio #SampleRate #BitDepth #BufferSize #AudioInterface #MusicProducer #RecordingStudio #EDMProduction #DJTrainingAcademy #AudioScience #MixingAndMastering #DigitalAudio #ProducerLife #SoundDesign #LearnMusicProduction #DJTips
Thanks for reading
That’s all, folks! Thank you for reading, and remember, the key to becoming a great DJ or a music Producer, starts with the right foundation. Here at DJ Training Academy, we make sure to provide that right kick start to your DJ & Music Production journey.
If you found this review helpful, don't forget to like, share, and subscribe to our blog for more tips, tutorials, and reviews. We would love to hear from you. So do comment, and share your experience if you have used the product before.
Disclaimer:
The information shared in this blog has been carefully compiled from a range of credible and reputable online sources, along with insights from our experienced team of artist-bloggers who possess extensive hands-on knowledge in the fields of DJing and music production.
As a growing academy, we often face limitations in securing direct product endorsements, complimentary equipment, or licensed software for review and demonstration purposes. Due to the high costs associated with professional DJ and music production gear, we rely on such informational and reference-based content to ensure our students and readers stay informed about the latest tools, technologies, and advancements within the industry. We do not claim ownership of any videos or images sourced from third-party platforms or channels.
All information presented is used strictly for educational purposes only, with the aim of keeping our students and subscribers up to date on the newest DJ and music production equipment, software updates, features, and industry developments.
If any individual, company, or organization has concerns or objections regarding the use of any referenced material, we kindly request that you contact us at djta.delhi@gmail.com, and we will take immediate steps to address and resolve the matter.
Thank you for your understanding and continued support.
Why Choose DJ Training Academy New Delhi for DJ & Music Production Courses?
DJ Training Academy, New Delhi, is committed to helping DJs of all levels master industry-leading equipment. Our dedicated team offers a range of courses, including beginner & advanced course modules in Djing & Music Production specialized sessions focused on using cutting-edge industry standard education. Students gain access to hands-on training, real-time guidance, and tips to get the best out of the latest DJ controllers, mixers, and production tools.
Join Our Community
Looking for DJ Course?
or
Need Help for your first DJ Starter Kit?
If you need help setting up your first DJ Starter Kit or are looking to buy DJ equipment at the best possible price, look no further. We are here to help and provide you with the best prices and customize your DJ kit bundles according to your budget.


Comments